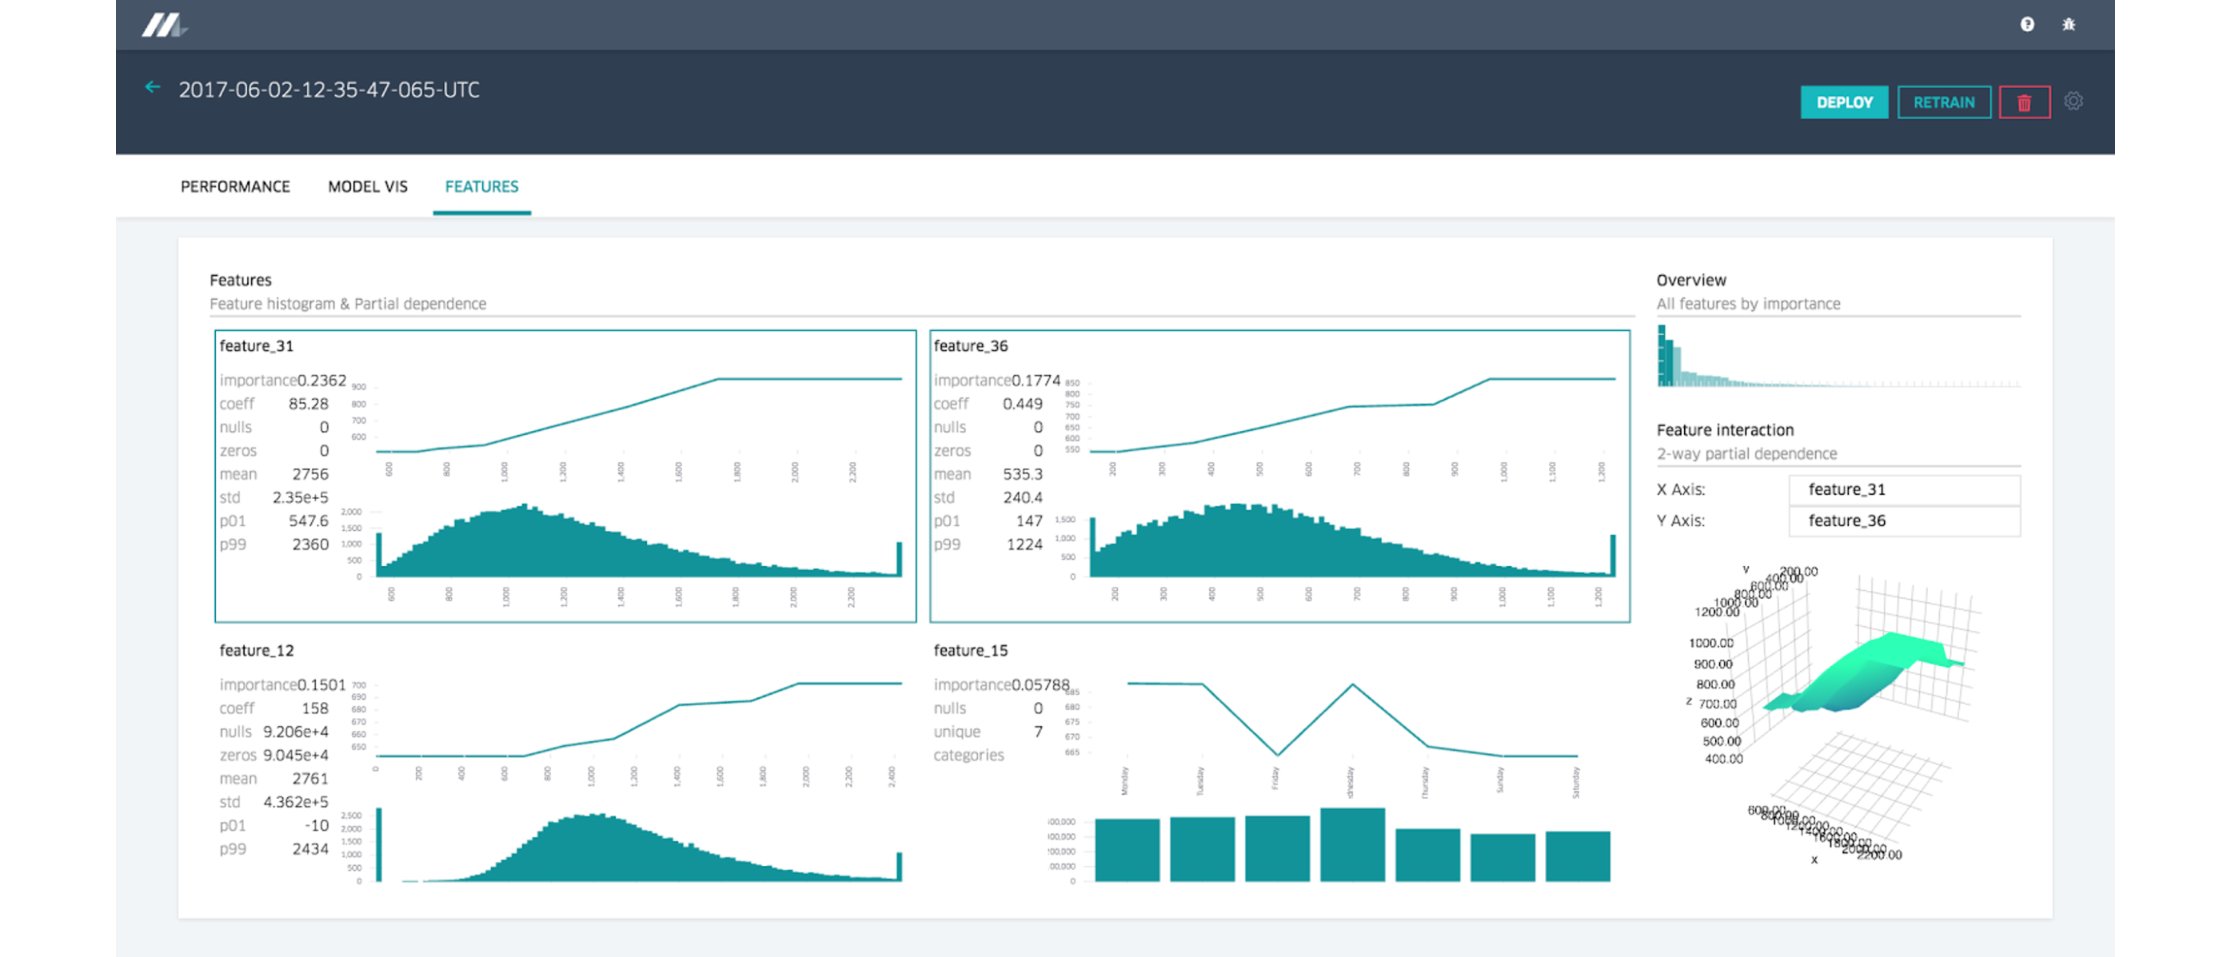
Build your own automl with 100 lines of code

As you know I am running machine learning for all  to experiment with automated machine learning with all the people that want to try it for free.

This time I want to share with you some of code running behind the scenes , in particular the scala code that , once a file with data and one with target column has been uploaded for analysis to a temporary folder of my azure blob account, trigger the execution of the entire automated machine learning workflows that , as I explained here runs on top of TransmogrifAI .

Of course there is a LOT that can be improved (how many times am I rewriting the same blob configuration paths ?????, proper error management, etc…) but it’s a starting point :-):

import com.salesforce.op.features.FeatureBuilder
import org.apache.spark.SparkConf
import org.apache.spark.sql.SparkSession
import org.apache.log4j.{Level, LogManager}
import org.apache.spark.sql.types._
import com.salesforce.op._
import com.salesforce.op.features.types._
import com.salesforce.op.stages.impl.regression.RegressionModelSelector
import com.salesforce.op.stages.impl.classification._
import org.apache.hadoop.fs.{FileSystem, FileUtil, Path}

object AzureBlobAnalysisv2 {
  def main(args: Array[String]) {
    LogManager.getLogger("com.salesforce.op").setLevel(Level.ERROR)
    val conf = new SparkConf()
    conf.setAppName("AutoMLForAll")
    var uniqueId=args(0)

    /* WASB */
    conf.set("spark.hadoop.fs.wasb.impl", "org.apache.hadoop.fs.azure.NativeAzureFileSystem")
    conf.set("fs.azure.account.key.REPLACETHIS.blob.core.windows.net", "REPLACETHISKEY")
    implicit val spark = SparkSession.builder.config(conf).getOrCreate()
    spark.sparkContext.hadoopConfiguration.set("spark.hadoop.fs.wasb.impl", "org.apache.hadoop.fs.azure.NativeAzureFileSystem")
    spark.sparkContext.hadoopConfiguration.set("fs.azure.account.key.REPLACETHIS.blob.core.windows.net", "REPLACETHISKEY")
    val confh=new org.apache.hadoop.conf.Configuration()
    confh.set("spark.hadoop.fs.wasb.impl", "org.apache.hadoop.fs.azure.NativeAzureFileSystem")
    confh.set("fs.azure.account.key.REPLACETHIS.blob.core.windows.net", "REPLACETHISKEY")
    confh.set("fs.defaultFS","wasbs://REPLACETHIS@REPLACETHIS.blob.core.windows.net")
    val fs=FileSystem.get(confh)

    //Copy Files from tmp to proc
    FileUtil.copy(fs,new Path("wasbs://REPLACETHIS@REPLACETHIS.blob.core.windows.net/tmp/"+uniqueId+".csv"),fs,new Path("wasbs://REPLACETHIS@REPLACETHIS.blob.core.windows.net/proc/"+uniqueId+".csv"),true,confh)
    FileUtil.copy(fs,new Path("wasbs://REPLACETHIS@REPLACETHIS.blob.core.windows.net/tmp/"+uniqueId+".txt"),fs,new Path("wasbs://REPLACETHIS@REPLACETHIS.blob.core.windows.net/proc/"+uniqueId+".txt"),true,confh)
    // Read data as a DataFrame
    var passengersData = spark.sqlContext.read.format("csv")
      .option("header", "true")
      .option("inferSchema", "true")
      .load("wasbs://REPLACETHIS@REPLACETHIS.blob.core.windows.net/proc/" + uniqueId + ".csv")
    val targetColumn = spark.sparkContext.wholeTextFiles("wasbs://REPLACETHIS@REPLACETHIS.blob.core.windows.net/proc/" + uniqueId + ".txt").take(1)(0)._2
    //Convert Int and Long to Double to avoid Feature Builder exception with Integer / Long Types
    val toBechanged = passengersData.schema.fields.filter(x => x.dataType == IntegerType || x.dataType == LongType)
    toBechanged.foreach({ row =>
      passengersData = passengersData.withColumn(row.name.concat("tmp"), passengersData.col(row.name).cast(DoubleType))
        .drop(row.name)
        .withColumnRenamed(row.name.concat("tmp"), row.name)
    })
    //Let's try to understand from the target variable which ML problem we want to solve
    val view = passengersData.createOrReplaceTempView("myview")
    val countTarget = spark.sql("SELECT COUNT(DISTINCT " + targetColumn + ") FROM myview").take(1)(0).get(0).toString().toInt
    val targetType = passengersData.schema.fields.filter(x => x.name == targetColumn).take(1)(0).dataType
    //Max Distinct Values for Binary Classification is 2 and for multi class is 30
    val binaryL: Int = 2
    val multiL: Int = 30

    //If the target variable has 2 distinct values and it is numeric can be a binary classification
    if (countTarget == binaryL && targetType == DoubleType) {
      val (saleprice, features) = FeatureBuilder.fromDataFrame[RealNN](passengersData, response = targetColumn)
      val featureVector = features.toSeq.autoTransform()
      val checkedFeatures = saleprice.sanityCheck(featureVector, checkSample = 1.0, removeBadFeatures = true)
      val pred = BinaryClassificationModelSelector().setInput(saleprice, checkedFeatures).getOutput()
      val wf = new OpWorkflow()
      val model = wf.setInputDataset(passengersData).setResultFeatures(pred).train()
      val results = "Model summary:\n" + model.summaryPretty()
      model.save("wasbs://REPLACETHIS@REPLACETHIS.blob.core.windows.net/models/" + uniqueId + "/binmodel")
      val dfWrite = spark.sparkContext.parallelize(Seq(results))
      dfWrite.coalesce(1).saveAsTextFile("wasbs://REPLACETHIS@REPLACETHIS.blob.core.windows.net/results/" + uniqueId + ".txt")
    }
    //If the target variable has more that 2 distinct values , less than 30 and it is string type can be a multi-classification
    else if (countTarget > binaryL && countTarget < multiL && targetType == StringType) {
      val (saleprice, features) = FeatureBuilder.fromDataFrame[Text](passengersData, response = targetColumn)
      val featureVector = features.toSeq.autoTransform()
      val pred = MultiClassificationModelSelector().setInput(saleprice.indexed(), featureVector).getOutput()
      val wf = new OpWorkflow()
      val model = wf.setInputDataset(passengersData).setResultFeatures(pred).train()
      val results = "Model summary:\n" + model.summaryPretty()
      model.save("wasbs://REPLACETHIS@REPLACETHIS.blob.core.windows.net/models/" + uniqueId + "/multicmodel")
      val dfWrite = spark.sparkContext.parallelize(Seq(results))
      dfWrite.coalesce(1).saveAsTextFile("wasbs://REPLACETHIS@REPLACETHIS.blob.core.windows.net/results/" + uniqueId + ".txt")
    }
    // If it's not a classification then we can try a regression
    else {
      val (saleprice, features) = FeatureBuilder.fromDataFrame[RealNN](passengersData, response = targetColumn)
      val featureVector = features.toSeq.autoTransform()
      val checkedFeatures = saleprice.sanityCheck(featureVector, checkSample = 1.0, removeBadFeatures = true)
      val pred = RegressionModelSelector().setInput(saleprice, checkedFeatures).getOutput()
      val wf = new OpWorkflow()
      val model = wf.setInputDataset(passengersData).setResultFeatures(pred).train()
      val results = "Model summary:\n" + model.summaryPretty()
      model.save("wasbs://REPLACETHIS@REPLACETHIS.blob.core.windows.net/models/" + uniqueId + "/regmodel")
      val dfWrite = spark.sparkContext.parallelize(Seq(results))
      dfWrite.coalesce(1).saveAsTextFile("wasbs://REPLACETHIS@REPLACETHIS.blob.core.windows.net/results/" + uniqueId + ".txt")

    }
    //if everything went smooth let's move files to the done folder
    FileUtil.copy(fs,new Path("wasbs://REPLACETHIS@REPLACETHIS.blob.core.windows.net/proc/"+uniqueId+".csv"),fs,new Path("wasbs://REPLACETHIS@REPLACETHIS.blob.core.windows.net/done/"+uniqueId+".csv"),true,confh)
    FileUtil.copy(fs,new Path("wasbs://REPLACETHIS@REPLACETHIS.blob.core.windows.net/proc/"+uniqueId+".txt"),fs,new Path("wasbs://REPLACETHIS@REPLACETHIS.blob.core.windows.net/done/"+uniqueId+".txt"),true,confh)
    spark.close()
  }
}


So essentially the code performs the following tasks:

  • Receives the unique id that has been assigned for each automl request (this happens externally)
  • Searches for the csv files containing data and metadata (target column) moving them to a process folder
  • Looking at the data decides which ML workflow has to be executed
  • Collects the results of the analysis (results and trained models) and the files moving them to their final folders.

Let me know your feedback !

The automated machine learning journey

Hi everyone , this time I would like to share some of the insights I discovered while working on automated machine learning projects , discussing the vision, what is achievable today and what the future can be.

The vision, or at least my vision, is that with proper tools/software we can and we have to empower all the employees to use their business/domain knowledge to take data driven decisions that impact company performance.

Now let’s dig a bit in the vision statement and let’s understand what are the step by step elements that we need to have in place:

  • Valuable business/domain knowledge
  • Be able to handle/learn/master quickly new tools/software
  • Be able to extract/combine/clean data from internal and external sources
  • Be able to transform insights into decisions

At first sight it seems very difficult to find someone with all those characteristics and in fact it is truly difficult , however you can quickly overcame those difficulties with a team where different skills combined together can be sufficient to achieve the desired outcome.

One example can be the following :

  • Senior Manager with deep business knowledge, good understanding of company data and curious to experiment with new technologies
  • Data Analyst with good statistical background and good experience in extract/combine/clean data and that is able to code new solutions combining different technologies

Of course this is just an example but you can get the idea: you don’t have to search for unicorns but you can create those teams with your existing workforce , adding , if necessary, an initial external help to bootstrap your specific initiative.

Let’s make another example to show how an hypothetical automated machine learning project can be done:

  • Opportunity statement and selection: the Manager and Data Analyst prioritize the use cases that can at the same time produce a high impact, that are achievable (data availability in terms of quantity, quality and sources) and that can actually drive decisions (so not just insights search but real impact on the business processes).

  • Once the use cases are selected a time limit has to be defined in order to limit the effort for each bundle of use cases and test as fast as possible if positive results can be achieved.

  • Data collection and aggregation/combination of data. At this step the business expertise has to be blended with the data available and the potential data that you can obtain internally or externally to produce meaningful datasets that have the your target variable and as many as possible potential influencing factors.

  • Treasure hunt! Yes at this stage using automated machine learning you can quickly iterate with hundreds of models and different hypothesis, and this usually triggers the need of more data that has to be added to the datasets. It’s very important to time box this stage otherwise you can stay at this step for too much time without producing any results.

  • Treasure found! Depending of a variety of factors (availability of data, ability to model the data, luck, etc…) you have unlocked a small or big insight that is telling you: your target variable is influenced by A, B, C, D, etc…

  • Understand what you can do about it. Yes you found that A,B,C,D.. are influencing factors but  what are , among A,B,C,D…, the variables that you can truly change and with this change have a better performance?

  • Optionally Simulate. Once you found that you can control only A and D for example, simulate the possible variations of A and D values combined with your business constraints and find the values that can boost the performance of your process.

  • Execute and Monitor. Apply the findings of previous steps , measure the impact that you are generating and monitor the deviations between the expected outcomes and the real ones.

At the final stage it will be probably needed a developer in order to integrate the machine learning models with your processes and also a platform that is able to monitor/maintain the model lifecycle and data drift, but the most mature automated machine learning solutions offer that inside their package.

What about the future?

Probably we will see even more automation coming:

  • automated suggestions of related (internal & external) datasets to the ones we are using
  • automated transformations looking at the cardinality of our datasets
  • automated/semiautomated data pipeline creation/sharing in and between ml projects
  • automated/semiautomated industrialization (not only model exposed as api but model exposed as a complete app / embedded in existing apps)

Machine Learning for All

One of the my dream applications since I started working with data has been a “magic” app that was able to provide me , for a given a dataset, the insight I was looking for.

At the same time in my work I observed several times the need of this kind of tool, so I decided to create a simple website http://mlforall.azurewebsites.net/ (still alpha version) to try to see if I was able to assemble something like that.

How it works?

  1. Upload a csv file with the data you want to analyze
  2. Choose the column you want to understand
  3. Done! In few minutes you will receive in your email the results!

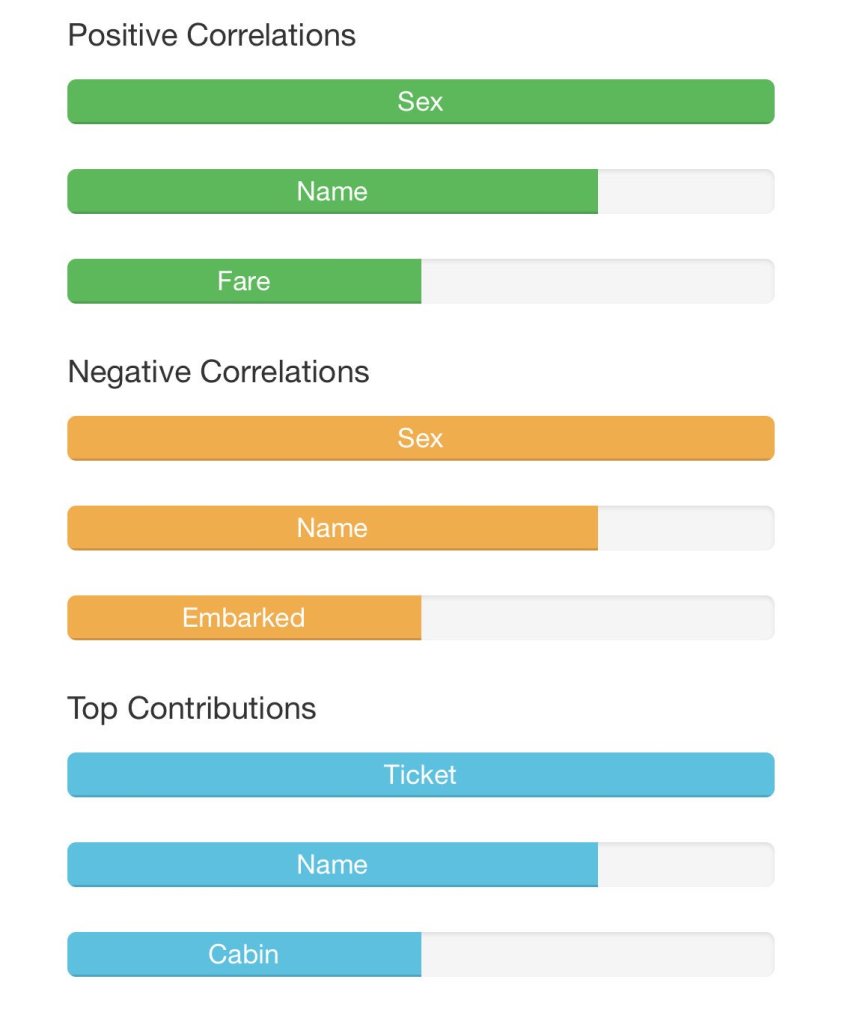
You can for example upload the Titanic dataset  , choose the Survived column as your objective and in few minutes have this:

DmovwzhW0AEfNfY

So this means that sex and price/kind of ticket were very important factors for the survival. In fact looking at the data you can see that a significant part of the people that survived were female and/or having a first class ticket.

What about name? Well in reality name contains Mrs, Mr terms that are an equivalent of sex and that’s why they are marked as important.

Now I guess the question you have is : why are you doing this and how are sustaining the costs of this?

The answer to the first question is that I want to understand if really “normal” people can benefit from tools like this.

The answer to the second question is that actually it’s me paying but with tight cost control and the right architecture you can do the same for few dollars or even less every day.

Let’s go then to the architecture and the software stack (still work in progress of course):


Screen Shot 2018-09-11 at 4.12.32 PM

In essence the flow is the following:

  1. File upload on the web site (App Service) lands in blob storage container
  2. Azure function is triggered and after some checks invokes a Logic App
  3. Logic Apps creates and monitors Containers Instances and destroy them.
  4. Container Instances pull from Docker hub a custom made docker image (containing Spark runtime, trasmogrifAI and some custom Scala classes) and it starts its execution
  5. The Spark cluster made by those containers processes the file, produces the output in a blob storage container, and goes in “finished” state ready to be destroyed
  6. Another Azure function triggered by the output creation reads the report and sends this data to SendGrid with the email of the person that requested that analysis

Of course things are a bit more complicated than this (we use also some azure blob storage table to manage preferences and file metadata) but you got the point.

With this architecture the current costs are very limited (some days few cents of dollar) and I hope it can continue to run without breaking my pockets.

Hope you like it and if you try it reach me on twitter for feedback.

Cloud (perfectly?) Part 1

If you ask to your friends how to cook chicken perfectly you will have several different answers depending on their preferences, their style of cooking , their taste, etc.. but one thing they will all agree : a badly cooked chicken will not taste good and can be even dangerous for your health.

image2

Same applies to cloud deployments , we all have our ideas on what are the best solutions, architectures, etc.. but we all are able to understand when something seems not completely right..

Let’s try to list those aspects:

  1. Paying for resources when we don’t use them
  2. Having to worry about OS patches & security scans
  3. Resources you cannot access easily on the go (mobile devices, home, remote)
  4. Resources that do not auto scale according to the demand/traffic
  5. Resources that can instead grow indefinitely without limits/control
  6. Resources that to be maintained need great efforts
  7. Technologies that are quickly obsolete

image3

Of course the list can continue but before adding other points let’s see also some common desires instead:

  1. Use open source technologies for innovation
  2. Avoid Vendor Lock In
  3. Be Cloud Portable : enable Multi Cloud.
  4. Be Secure : No shared resources with other individuals, no internet exposed endpoints, MFA, etc…
  5. Be resilient: Multiple backups of the data, disaster recovery plans, multiple data centers/zones used
  6. Be global: Data/Applications replicated across the globe with robust consistency
  7. Be fast: Any write/update/read/query/page view should happen in milliseconds

image4

So in a perfect world to avoid the pitfalls we would like to have/manage cloud resources that have auto start/stop/scale up/scale down according to traffic/usage with safe limits, that we pay by second when used, that we don’t manage at OS level, that are accessible from anywhere, that a team of 2-3 people can easily manage and that the underlying technology is constantly updated to the latest and greatest standards.

At the same time we can quickly understand that several of the common desires are not simply doable in this perfect world… , let’s take an example: if we want to use the latest and the greatest open source software it’s often our duty to manage OS.

Similarly if we want to be cloud portable we cannot leverage any cloud specific solution and we have to work at the lowest denominator between clouds : VMs , so again we have to manage OS and probably having army of people developing scripts and packages that have been tested against all the different versions of VM/Network/Storage/Accounts/etc.. across different clouds.

Always in this hypothesis we have to script by ourself the start/stop/scale up/down logic, monitoring, etc.. and we have to basically create our own “multi cloud account/network/storage/etc… provider”.

Now all of this , even if it seems very hard to do, it has been done completely or partially by giants like Facebook, Spotify, etc…, so in theory any company can do the same at some conditions:

  1. Put on the plate the same level of investment of those companies
  2. Being able to attract and hire the same level of talented employees
  3. Having very few specialized IT workloads that are in the end the main revenue stream of company itself (so “the product sold is the software shipped” ).

image5

UniFi – Install a UniFi Cloud Controller on Google Cloud Platform Compute Engine

Let’s see this time how to set up the UniFi Controller software on GCP with very simple steps.

Step 1 : Go the following website https://console.cloud.google.com/ and register . You will receive 300$ of Google credits that can be used in the first 12 month, but more importantly the free tier  !

Step 2: Once you have your account up and running you can provision a Linux Instance clicking on the big “Compute Engine” and VM instances

Step 3: After you selected the Virtual Machine just give to it a name,, choose a data center near to where you live, pick as size the micro (free!), as OS pick Ubuntu 16.04

Step 4: Set the a network tag for this Instance it will be used later and set ssh keys if needed ( you can do everything with the web ssh console without having to specify this)

Step 5: In the additional settings leave everything to the default values and finally hit the create button!

Step 6: After few seconds your Instance is ready and you should be able to see it running , write down the Public IP Address because you will need it shortly.

Step 7: Now we have to setup the open ports in order to have the Controller working correctly.

First go the the VPC network tab of your account and select Firewall Rules:

Here add a firewall rule specific for your controller instance using the Target tag that we defined early, put 0.0.0.0/0 as IP range to allow connections from any IP and set those ports to be open:

tcp:8443;tcp:8080;tcp:8843;tcp:8880;tcp:6789;udp:3478 .  

Here a screenshot of those settings:

Step 8: Connect with the web console ssh and install the Unifi controller software with those commands:

echo “deb http://www.ubnt.com/downloads/unifi/debian unifi5 ubiquiti” | sudo tee -a /etc/apt/sources.list

sudo apt-key adv –keyserver keyserver.ubuntu.com –recv 06E85760C0A52C50

sudo apt-get update

sudo apt-get install unifi

Step 9: Connect to the controller web interface located here https://IP_Address:8443/ and complete the UniFi wizard:

Finally you may now proceed to adopt your UniFi devices using Layer 3 Adoption !

Automated Machine Learning with H2O Driverless AI

Hi everyone , this time I want to evaluate another automated machine learning tool called H2O Driverless AI and also compare it with DataRobot (of course a very lightweight type of comparison analysis has been done).

First great feature of H2O driverless AI is that you can have it instantly (almost) as long you have an Amazon, Google or Azure account you can spin up a H2O Driverless quite easily as described here  :

azure_vm_size

You can choose if you want to Bring your own license (you can ask an evaluation of 21 days as I did) or pay the cost of the license inside the hourly costs of the VM in your cloud provider.

Once you have your VM up & running, my suggestion is to update it to the latest docker image of H2O Driverless AI as described into the how to

sudo h2oai update

and then connect to the UI.

Once connected you can upload directly from the UI the datasets you like and perform ML experiments with them choosing which column you want predict/analyze and what is the metric you want to measure your model (AUC, etc..).

Here one running on 4 GPUs:

Screen Shot 2018-03-22 at 9.23.38 AM

Once experiment is finished with the interpreting model page you can understand the key influencers in your dataset for the target column you were interested to analyze/predict.

viewing_results

Since few days ago I did some test with DataRobot and Kaggle competitions I tried to perform the same on H2O and the results are….

Titanic Competition (metric accuracy –> higher better):

DataRobot 0.79904 (Best)

H2O 0.78947

House Prices Regression (metric RMSE –> lower better):

DataRobot 0.12566 (Best)

H2O 0.13378

As you can see on both DataRobot leads but the results of H2O are not so far away !

Talking instead of model understanding and explicability of the results in “human” terms I see DataRobot offering more different and meaningful visualizations than H2O, additionally you can decide by yourself which of the many models you want to use and not only the winning one (there are cases where you want to use one that is less accurate but that has a higher evaluation (inference) speed), while with H2O you have no choice than using the only one surviving to the process of automatic evaluation.

H2O however is more accessible in terms of testing/trying , it offers GPU acceleration that is a very nice bonus especially on large datasets .

Happy Auto ML !

Extending UniFi Data Analysis & Reports

Hi everyone, this time I want to share one of my preferred side activities : playing with my Ubiquiti home setup!

As you already know I have my controller running on Azure , but I wanted to understand more on which kind of data is stored inside the controller, in other words where the data that we see in the controller dashboard is stored.

2015-09-16_6-48-19

Inspecting the binaries and looking in 2-3 posts on the forums I figured out that this data is sitting in a mongodb database, but I wanted of course to look a bit inside of this database.

What I did is the following, I made a backup of the data of the controller using the web interface of the controller and I downloaded it locally:

screen_shot_2016-08-23_at_09-25-34

At this stage I downloaded the controller software for an installation on my laptop (Macbook) and at controller startup i requested a restore of the backup i just downloaded from the cloud controller.

restore_setup

Once the restore is done, mantain the controller running and you can use a mongodb client like robo 3T  and connect to localhost and port 27117 (we connect to the mongod process started by the controller locally).

Screen Shot 2018-05-02 at 9.22.56 PM

This is great! But I would like to produce some nice dashboards , with some visualization tool like Tableau or PowerBi or simply Excel but the data in a “Document” format while I need it to be in Table/Records format.

The solution is the Mongo Bi Connector that is a kind of “wrapper” or “translator” between the “Document” world and the tables/records world.

But things are never simple ;-), this connector works only from MongoDB v. 3.0 or higher while the one inside the controller software is 2.6. So first we have to download a separate mongodb server that works with it but more importantly upgrade the database itself to the 3.X format.

First let’s copy the database from the controller folder (check a folder called db) and copy it to another location, write down this location.

I tested and failed various times before understanding how to do it but this is the sequence (using brew to install mongodb on my mac):

install mongodb 3.0 –> open the controller database in the location we copied.

uninstall 3.0 /install 3.2 –> open the controller database in the location we copied.

uninstall 3.2 /install 3.4 –> open the controller database in the location we copied.

This will bring the database to a format that is working with the Bi Connector.

Screen Shot 2018-05-02 at 5.55.20 PM

Now in the Bi Connector you can extract the schema of a document collection you like (for example the stat_daily collection of ace_stat database) and after that spawn the wrapper process that can be used by a visualization tool:

Screen Shot 2018-05-02 at 9.38.10 PM

In my case I used tableau to create some test dashboards:

Screen Shot 2018-05-02 at 4.28.23 PM

Here I see that the CPU of my gateway was a bit high during the first part of the month and then decreased significantly.

I can add other metrics like downloaded data, etc.. to understand better:

Screen Shot 2018-05-02 at 4.30.13 PM

In reality in this specific case there is already a super nice visualization already offered by the controller dashboards:

Screen Shot 2018-05-02 at 5.54.18 PM

So the real interesting thing here is that you can actually create your own report and also discover new insights looking at the your own network data

So what are you waiting for ? Happy custom reports on your Unifi network and device data!

Automatic Machine Learning with DataRobot

Hi this time I want to share with you my experimentations with a DataRobot , an automated machine learning software that has promised to help to leverage machine learning techniques with few clicks of mouse .

Let’s see it in action with a very simple dataset, the so called Titanic: Machine Learning from disaster competition on Kaggle (Extract):

“The sinking of the RMS Titanic is one of the most infamous shipwrecks in history.  On April 15, 1912, during her maiden voyage, the Titanic sank after colliding with an iceberg, killing 1502 out of 2224 passengers and crew. This sensational tragedy shocked the international community and led to better safety regulations for ships.

In this challenge, we ask you to complete the analysis of what sorts of people were likely to survive. In particular, we ask you to apply the tools of machine learning to predict which passengers survived the tragedy.”

The data looks like this:

Screen Shot 2018-04-24 at 9.21.21 PM

and we can see that for each passenger we have some data (Name, Sex, Age,  Port of Embark, Ticket Class) and the indication if this passenger is survived to the Titanic sank in the Survived column. Our objective is to discover as much as possible inside all the information we have about passengers if there are and what are the key influencers of the survival .

The interface of DataRobot is very simple at the start, asking us to upload the data we have: Screen Shot 2018-04-24 at 9.33.03 PM

Once the upload is done DataRobot asks us which is the column we want to “predict” :

Screen Shot 2018-04-24 at 9.35.49 PM

and once we select our target column we can press the big “Start” button .

Here DataRobot analyzes our file and calculates how many models are suitable for this data and once done that start automatically “training” all those models in parallel according to the process power we select (“workers” setting).

Screen Shot 2018-04-24 at 9.38.15 PM

Screen Shot 2018-04-24 at 9.41.30 PM

Once all the models are trained on the leaderboard we can find at first place the best model possible according to the metric that DataRobot picks for the problem we are trying to solve.

Once we have selected the “best model” we can understand what are the key findings like those ones:

Screen Shot 2018-04-24 at 9.51.48 PM

Screen Shot 2018-04-24 at 10.10.09 PM

in other words females in first class had high chances of survival while men in third class were really at risk of not surviving.

Using the predict feature of Data Robot we tested with an external kaggle “test” file the accuracy of this model uploading the predictions obtained by Data Robot to Kaggle and here is the result:

Screen Shot 2018-04-24 at 9.55.48 PM

which is absolutely not bad , because given the fact that 9408 data scientists participated to this competition , this means I am in the top 18% globally!

The pros: I did not touch the data like adding more features, normalizing the data, removing columns like IDs , etc…, the data was analyzed by DataRobot as is.  I used all default settings without touching any “advanced option”.

The cons: DataRobot misses a data preparation functionality (you can try products like  Alteryx or Trifacta in combination with DataRobot) and this means that we have to at least use two products to manage end to end a data science experiment that involves typically operations like joins of multiple tables, files, complex aggregations, sub queries, etc..

Finally while we have to absolutely admit that 80% of data science experimentation job is around data collection, source access, data preparation, cleaning, etc.., at the same time DataRobot can unlock several quick wins and opportunities in all the IT departments where several analysts /developers are really expert in those activities , they have the business knowledge of the data but they lack data science abilities .

Bot hand off to agent with Salesforce Live Chat Part 2

Hi our previous article we introduced the api calls to send and receive messages to a live agent on Salesforce. Now it’s time to add the bot component and combine bot and live agent to implement the hand off .

For the bot I used one the of frameworks I know better the Microsoft Bot Framework , but some of the concepts can be applied also to other bot solutions.

We start using the Bot Intermediator Sample provided here  , that has already some functionality built in. In particular it uses the bot routing engine that can has been built with the idea of routing conversations between user, bot and agent , creating when needed direct conversations between the user and agent that is actually routed by the bot using this engine.

Let’s see a way that we can use to combine this with salesforce live agent api , we will take some shortcuts and this solution it is not meant to be used in production environment, but hopefully can give you an idea of how you can design a fully fledged solution .

  1. When in the conversation is mentioned the word “human” the intermediator sample triggers the request of intervention of an agent and parks the request inside the database of pending requests of the routing engine . Our addition it has been to define an additional ConcurrentDictionary as in memory storage to store the request and its conversation and add later other properties interesting for us.
  2. Using quartz scheduling engine we can monitor with a recurring job the pending requests of the routing engine , dequeue them starting (always using quartz) an on demand job that opens a connection with live chat , waits that the agent takes the call and binds into to the request the sessionId and the other properties of the LiveChat session opened. This thread can finish here but before we start another on demand thread that is watching any incoming message coming for this request from LiveChat session and routes them to the conversation opened at step 1
  3. In the message controller of the bot, in addition to the default routing rules, we add another rule that checks if the current conversation is “attached” to a live chat session and if yes sends all the chat messages written by the user to the related live chat session.
  4. When the watch live chat session thread does not receive more messages goes in timeout or receives a disconnect/end chat event , it removes the conversation with live chat session from the dictionary and from this moment if the user writes again , he will write to the bot and he wants again to speak with an agent he has to trigger the human “keyword” again.

Here some screenshots:

Chat begins with bot that simply repeats the sentences we write

Screen Shot 2018-03-20 at 9.32.05 PM

Live Agent is ready to handle new calls

Screen Shot 2018-03-20 at 9.32.27 PM


Let’s ask for help

Screen Shot 2018-03-20 at 9.35.01 PM

And here the request arrives on live chat

Screen Shot 2018-03-20 at 9.35.15 PM

Once accepted we can start the hand off starting a case in salesforce

Screen Shot 2018-03-20 at 9.35.28 PM

And here we can check if we are taking to a human 🙂

Screen Shot 2018-03-20 at 9.38.56 PM

Screen Shot 2018-03-20 at 9.38.40 PM

In the third and final part we will look inside some code snipplets that show case this functionality and we will describe what can be a good design of the solution if we want to industrialize it.


Bot hand off to agent with Salesforce Live Chat Part 1

Hi everyone, one of the most requested features into modern implementations is a smooth transition from the automated response system (our lovely bot) to a human.

Our objective in fact is usually the following:

  1. Handle the customer request  first doing a qualification of the request (collect data, ask additional information)
  2. Now it can happen that the request can be handled with simple and repetitive solution and bot should exactly cover this scenario
  3. It can also happen that the request is so complex that can be handled only by a call center operator but we will make good usage of the operator’s time because he will be involved in an activity where he can bring a distinctive value

One the most used Call Center modules for human assistance on a case is Salesforce Live Chat and it makes sense to understand how we can make a transition from any bot implementation to Live Chat without requesting the customer to change UI, transition to another web page and more importantly to re-type all the information he wrote at the qualification state (so assuming that the triage has been done in the bot application we want to bring the entire conversation state from the bot to the live agent attention).

en-us95f47444a60dc1ae85cbea67423f8b5f

Let’s start with the basics and see the “how to” from the beginning:

First you need a salesforce developer sandbox for your testing , you can request one for free here.

Once you have your sandbox you have to enable the live agent functionality, following the steps described here , please pay attention to each step and your last step should be this one .

You can try if everything works just creating a sample html page with javascript created by the buttons functionality and the deployment one (remember to put the deployment javascript at the end of the page before the closing body tag!).

If you want an unofficial guide to help you more check also this blog  or this other blog .

At this point you should have your live chat working nicely and we can now proceed to study the salesforce live agent rest api that allow us to us the live chat functionality programmatically.

If you look a bit to how the API works you will soon notice that this API has been design to be consumed mainly directly by final clients (web pages or mobile apps) while it lacks some Server to Server functionality like web-hooks , so in a nutshell it is very helpful if you want to build a branded web page or IOS/Android app for call center support but it a bit less helpful to use it for transitioning a conversation from a server application (our bot).

In order to use the api we need some info: your Salesforce Organization Id ,  your live agent deploymentId , live agent buttonId and finally the live agent api endpoint.

You can find this info here and in this guide.

Ok now can finally start with some coding 🙂 , I will use c# (running from a Mac) so I guess it can run on any platform .

First we need to do our first rest call to retrive the session ID for the new session, the session key for the new session, the affinity token for the session that’s passed in the header for all future requests and finally the clientPollTimeout that represents the number of seconds before you must make a Messages request before your Messages long polling loop times out and is terminated (we will understand this better later):

 private static async Task<ChatObj> createSession()
         {
             string sessionEndpoint = liveAgentEndPoint + liveAgentSessionRelativePath;
             HttpClient client = new HttpClient();
         client.DefaultRequestHeaders.Accept.Add(new MediaTypeWithQualityHeaderValue("application/json"));
             client.DefaultRequestHeaders.Add("X-LIVEAGENT-API-VERSION", liveAgentApiVersion);
             client.DefaultRequestHeaders.Add("X-LIVEAGENT-AFFINITY", "null");
             HttpResponseMessage response = await client.GetAsync(sessionEndpoint);
             JObject jObj = new JObject();
             if (response.IsSuccessStatusCode)
             {
                 string resp = await response.Content.ReadAsStringAsync();
                 jObj = JObject.Parse(resp);

            }
             response.Dispose();
             ChatObj chatObj = new ChatObj();
             chatObj.setSessionId((String)jObj.GetValue("id"));
             chatObj.setAffinityToken((String)jObj.GetValue("affinityToken"));
             chatObj.setSessionKey((String)jObj.GetValue("key"));
             chatObj.setButtonId(liveAgentButtonId);
             chatObj.setSequence(1);
             client.Dispose();
             return chatObj;
         }

Now that we have this information we can actually say to the live agent that we would like to start a chat session with him (!) and this requires another api call to request a chat visitor session and this session will be actually opened only when the live agent accepts the request into the salesforce console.

So first we do the request:

  private static async Task createChatRequest(ChatBag chatObj)
         {
             
             HttpClient client = new HttpClient();
             client.DefaultRequestHeaders.Accept.Add(new MediaTypeWithQualityHeaderValue("application/json"));
             client.DefaultRequestHeaders.Add("X-LIVEAGENT-API-VERSION", liveAgentApiVersion);
             client.DefaultRequestHeaders.Add("X-LIVEAGENT-AFFINITY", chatObj.getAffinityToken());
             client.DefaultRequestHeaders.Add("X-LIVEAGENT-SESSION-KEY", chatObj.getSessionKey());
             client.DefaultRequestHeaders.Add("X-LIVEAGENT-SEQUENCE", "1");
             JObject body = new JObject();
             body.Add(new JProperty("organizationId", liveAgentOrgId));
             body.Add(new JProperty("deploymentId", liveAgentDeploymentId));
             body.Add(new JProperty("buttonId", liveAgentButtonId));
             body.Add(new JProperty("sessionId", chatObj.getSessionId()));
             body.Add(new JProperty("trackingId", ""));
             body.Add(new JProperty("userAgent", "Mozilla/5.0 (Macintosh; Intel Mac OS X 10_11_6) AppleWebKit/537.36 (KHTML, like Gecko) Chrome/50.0.2661.102 Safari/537.36"));
             body.Add(new JProperty("language", "en-US"));
             body.Add(new JProperty("screenResolution", "1440x900"));
             body.Add(new JProperty("visitorName", "ConsoleTest"));
             body.Add(new JProperty("prechatDetails", new List<String>()));
             body.Add(new JProperty("receiveQueueUpdates", true));
             body.Add(new JProperty("prechatEntities", new List<String>()));
             body.Add(new JProperty("isPost", true));
             StringContent cnt = new StringContent(body.ToString(), Encoding.UTF8, "application/json");
             HttpResponseMessage response = await client.PostAsync(liveAgentEndPoint + liveAgentChasitorRelativePath, cnt);
             if (response.IsSuccessStatusCode)
             {
                 string responseText = await response.Content.ReadAsStringAsync();
             }
             response.Dispose();
             client.Dispose();

        }

If everything went right we should receive an “OK” as response while we wait for the operator to actually accept the visitor session request.

An important thing to notice is that the API supports prechatDetails and prechatEntities objects that we can use to bring with us the conversation data that the customer had with the bot , so the live agent can look at this info and immediately help the customer with the right context without re-asking the same questions.

Since the process of approval to start the chat is not automatic but we have to wait for the live agent to accept, at this stage we have just to poll the Message api and wait for having the confirmation using a thread that calls the api in this way:

  private static async Task<ChatMessageResponse> receiveMessages(ChatBag chatObj)
         {
             ChatMessageResponse jObj = new ChatMessageResponse();
             HttpClient client = new HttpClient();
             client.DefaultRequestHeaders.Accept.Add(new MediaTypeWithQualityHeaderValue("application/json"));
             client.DefaultRequestHeaders.Add("X-LIVEAGENT-API-VERSION", liveAgentApiVersion);
             client.DefaultRequestHeaders.Add("X-LIVEAGENT-AFFINITY", chatObj.getAffinityToken());
             client.DefaultRequestHeaders.Add("X-LIVEAGENT-SESSION-KEY", chatObj.getSessionKey());

            HttpResponseMessage response = await client.GetAsync(liveAgentEndPoint + liveAgentMessagesRelativePath);
             if (response.IsSuccessStatusCode)
             {
                 string respText = await responseContent.ReadAsStringAsync();
                 jObj = JsonConvert.DeserializeObject<ChatMessageResponse>(respText);

                 if (jObj!=null)
                   {
                     var msgs = from x in jObj.messages
                                                             where x.type == "ChatRequestSuccess"
                                    select x;
                     foreach (Messages activity in msgs)
                     {
                         Console.WriteLine("VisitorId: " +activity.message.visitorId);
                     }
                     
                 }
             }
             response.Dispose();
             client.Dispose();
             return jObj;
         }

Ok so when we receive the ChatRequestSuccess Type message, this means that chat request was successful and routed to available agents .

To be completely sure that an agent really accepted our conversation we have to wait for the ChatEnstablished Type message where we can also read the name and the id of the agent answering us.

Ok now we can finally send an “Hello Mr Agent!” text to our Live Agent with this api:

  private static async Task sendTxtMessage(ChatBag chatObj,string textToSend)
         {
             
             HttpClient client = new HttpClient();
             client.DefaultRequestHeaders.Accept.Add(new MediaTypeWithQualityHeaderValue("application/json"));
             client.DefaultRequestHeaders.Add("X-LIVEAGENT-API-VERSION", liveAgentApiVersion);
             client.DefaultRequestHeaders.Add("X-LIVEAGENT-AFFINITY", chatObj.getAffinityToken());
             client.DefaultRequestHeaders.Add("X-LIVEAGENT-SESSION-KEY", chatObj.getSessionKey());
             JObject bodyT = new JObject();
             bodyT.Add(new JProperty("text", textToSend));
             StringContent cnt = new StringContent(bodyT.ToString(), Encoding.UTF8, "application/json");
             HttpResponseMessage response = await client.PostAsync(liveAgentEndPoint + liveAgentChasitorChatRelativePath, cnt);
             if (response.IsSuccessStatusCode)
             {
                 string respText = await responseStep2.Content.ReadAsStringAsync();
             }
             response.Dispose();
             client.Dispose();
         }

And we can receive the replies of the agent always using the same receive message polling technique but this time searching for  ChatMessage  type kind of messages.

In the next part of the article I will go through the integration with a bot and attempt to see how we can implement the hand off !